Tuya Wi-Fi Alarm System Installation

In this article we will be covering the installation of the Tuya Wireless GSM Home Security Alarm System. You may find this system sold under different brand names but the system installation and setup would be the same for all. We purchased our test system from AliExpress.com
What you get
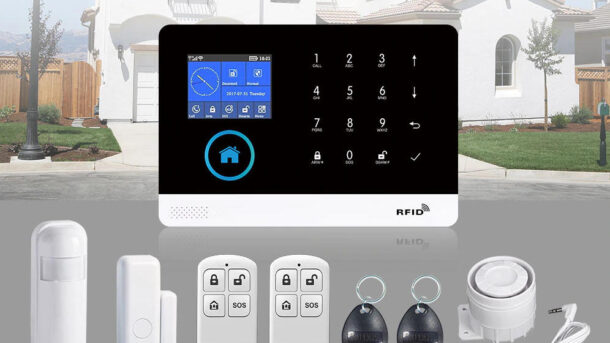
When purchasing this system you will need to choose from an array of kits/packages. The only difference would be quantity of sensors, fobs and remotes included. The actual devices would be exactly the same. A typical system would consist of a keypad/display, wireless door sensor(s), PIR motion detector(s), RFID Fobs, Remotes, and a siren.
Step 1- Keypad/Display Power Up
The first thing we need to do is setup the Keypad/Display. Connect the power adapter using the supplied USB cable into the Display’s USB micro connector on the side. Plug the adapter into a standard house wall receptacle.

Remove the battery tab (plastic tab) from the Display. This will connect the internal battery which will power the Display should there be a power outage. Next turn On the Display by pushing and holding the side Power Switch. At this point your Display should now be active and the LCD screen should display the default menu.
It defaults to English so if you want another language (total of 9 available) you can quickly change it by selecting the Down arrow(), select Settings() , x 3 until you get to Language then to select. Select the appropriate Language by using the key then . The Display should now be in your language of choice.

Step 2 - Installing the Smart Life App
To be able to receive notifications and control your system you will need the Smart Life App installed on your phone or device.
- Go to the App store on your phone and search for a App named Smart Life and select the Install button. In our example below we are using the Google Play Store.
- Accept the User Agreement and Privacy policy then select the Sign Up button.
- Fill in your Country and Email Address then select Get Verification Code. You will get a code sent to your email address. Enter the code into the Verification screen.

- Enter a Password then Select Done
- Enable or disable the Data Analysis option as you see fit. In my case I disable this option. Select the Go to App button. If you are prompted to allow Location permissions then go to your settings and turn on (allow) the Location Permission.
- You should now be in the Add Device screen


Step 3 - Adding the Alarm System to App
We now need to add your system to the App using your Wi-Fi network. Before beginning make sure your Phone/device is connected to same Wi-Fi network that will be used for the Alarm System.
- From the App’s Add Device screen select the Add Device button. Again, if you are prompted to allow Location permissions then select Settings -> Permissions -> Location -> Allow only while using app. Use the back key to return to App.
- From the Add Device screen select the option Sensors from the left menu.
- Next select Alarm (Wi-Fi) option from the sensor screen
- On the Wi-Fi screen enter the name (SSID) of your Wi-fi network. This needs to be a 2.4GHz network. This system will not work on 5GHz. Both your Phone and the Alarm system need to be on the same 2.4GHz network. Enter your network password and select Next

- At this point you may be presented with a “Reset the Device first” screen. This screen is intended for other types of devices that have a LED. Our system here has no such LED so simply select the Confirm option and select Next.
- An “Adding device…” screen will appear showing that it is scanning the network for the system. In about a minute it should detect your system and automatically add it to the App.
- When successful you will be presented with a screen stating the device was added successfully. It will also let you name the system. Go ahead and name it by selecting the Edit icon. Finally select Save then Done.

- A Notification Test message appears when security devices are added to the app on Android mobile phones. To ensure that notifications can be received, tap Test and follow the tips to verify that the autostart and battery usage detection permissions are granted to the app. You may not have these settings in your phone as it depends on your version and make. Newer versions do not require these settings. Select Next then Done
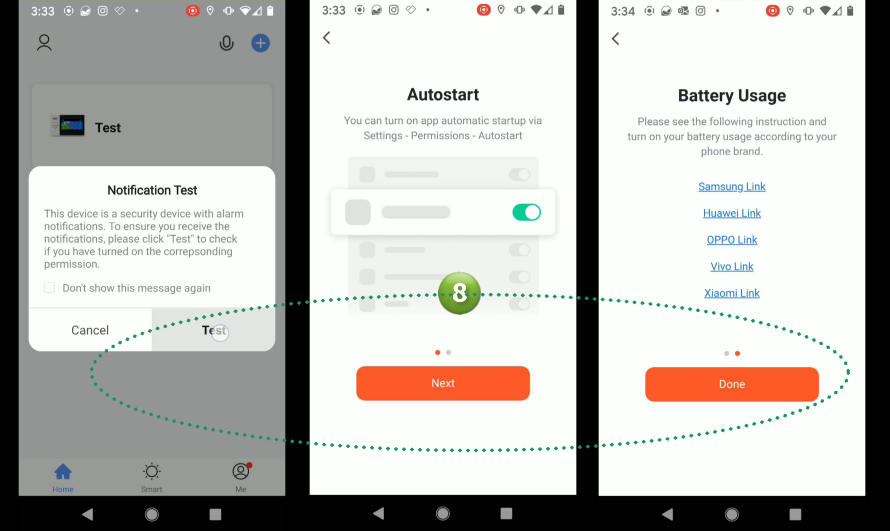
- The Alarm is now added to the Smart Life App and you should see your Alarm system in the Device list.
- To access your newly created alarm simply select it in the list. You should be presented with the Alarm’s main screen.

Step 4 - Enrolling Remotes

Key remotes allow you to Arm Away, Arm Stay, Disarm and generate an SOS. To add your remotes you need to be on the Main App screen.
- Select Accessories from the menu.
- Select Remote from Accessories then the Plus + to add
- At this point press and release the arm or disarm button on your remote while holding it near the display/keypad. The system should instantly read your remote and add it to the system.

- A Confirmation screen will be displayed. Select Confirm.
- To name your remote select it in the list and a editing screen will be displayed.
- Enter your name and select Save


Step 5 - Enrolling Sensors
We now need to tell the system what door/window/motion sensors you will be installing. This process is called enrolling. You can enroll sensors directly with the Display/keypad or by using the App. We will be using the App as it is a much easier process.
- From the App Main screen select Accessories.
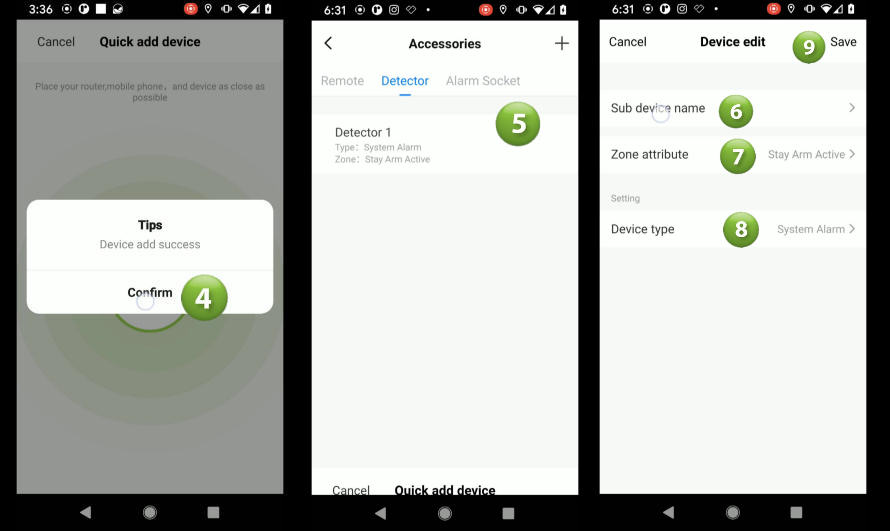
- From the Accessories screen select Detector then the Plus + to add
- The App will then search for your new sensor. Place sensor near Display and activate it. For a Door/Window sensor you can press the button or separate the magnet from the sensor. For a Motion sensor first turn it On by sliding the small switch on the rear of the sensor. Once activated the system will detect the sensor and will add it automatically to the system.

- A Confirmation screen will be displayed. Select Confirm.
- To name your sensor select it in the list and the Device edit screen will be displayed.
- Select Sub device name and enter your new name
- Select Zone attribute and select how you want this sensor to reactive when tripped. Refer to table below Zone Attributes.
- Select Device type and select the type that best describes this sensor i.e.: Door Alarm
- Select Save
Zone Attributes
| Out Arm Active | Active when you arm system in Away mode |
| 24 Hours Active | Active always – 24/hrs/day with siren |
| Close | Sensor is deactivated- will not cause an alarm |
| Door Bell | The sensor will act like a door bell and ring a chime (ding/dong) when tripped/activated. |
| 24 Hours Silent | Active always – 24 hrs/day but with no siren |
| Stay Arm Active without Delay | Active when you arm system in Stay mode and has no delay. Will instantly cause an alarm when tripped |
| Out Arm Active without Delay | Active when you arm system in Away mode and has no delay |
| Stay Arm Active | Active when you arm system in Stay mode |
Step 6 - Installing Wireless Door/Window Sensors

There are two parts of a wireless door sensor. A Magnet (smaller piece) and a Sensor. The Magnet is typically installed on the door or window itself while the Sensor is installed on the unmoveable frame. However, depending on your particular door/window you can reverse this as shown in the above image. Choose the best orientation for your situation while ensuring the gap between the Magnet and the Sensor is no more than 10mm or 1/4″. Important: Make sure the small triangle markings on each piece are lined up and facing each other. To install, remove the double sided tape backing from the magnet and Sensor and firmly place them on the door and frame. When done open the door/window to ensure the two pieces do not touch or rub. The Red LED should flash when you open the door/window. This signifies that a signal has been transmitted. Repeat these steps for all of your door/window sensors.
Step 7 - Installing Wireless Motion Detector

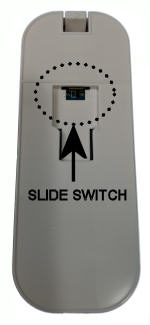
To install a Wireless Motion Detector first remove the detector section from the mounting bracket by holding the bracket then sliding the sensor up. Mount the bracket on the wall with the supplied screws and anchors if needed.
On the back of the sensor slide the ON/OFF switch to the ON position.
Placement of your motion detectors is important to ensure you get proper detection while avoiding false alarms. The following are some dos and don’ts when mounting your detector.
Don’ts
- Don’t point a detector at a window. Sun light will trip a PIR sensor.
- Don’t install this sensor where pets could enter the field of view (FOV). There are special detectors intended for use with pets.
- Don’t point at a hot air source like vents, heaters, air ducts, refrigerators or stoves
- Don’t mount pointing at ceiling fans or curtains
- Don’t mount detectors in a high humidity area like bathrooms and attics
Do’s
- Do mount between 6-8 feet (182cm-243cm) high from the ground/floor.
- Do mount sensor in a corner where possible. Corners tend to provide better coverage based on the pattern a detector senses
Step 8 - Mounting Keypad/Display
The Display/Keypad can be mounted on a wall or placed on a countertop or table using a stand like the Lamicall Adjustable Stand . Placing on a stand will allow you to somewhat hide the cables. On the other hand if you were to mount on a wall there would be cables running from the Keypad to the receptacle and siren that would be more visible. In any case both mounting types would work fine and would depend on your situation.
To mount on the wall first remove the mounting bracket from the back of the Keypad by sliding up. Mount the bracket using the screws and anchors provided. I would recommend using a level to ensure it’s straight. Slide the keypad back onto its mount and connect the power cable.
Mounting on stand is much easier. The Keypad comes with a built-in tamper switch on the rear of the Keypad. This is used to create an alarm should anyone remove the Keypad from the wall. You need to make sure the mounting bracket is installed into the rear of the Display. Then simply place the Keypad on the Stand and run you power cable to the closest receptacle.
Step 9 - Installing the Siren
The system comes with a hardwired siren that plugs into the side of the Keypad. However, it only comes with a short 3′ cable so you are limited on how far you can mount the Siren from the Keypad. Choose a suitable location and mount the siren using the screws provided then simply plugin the siren plug into the siren jack.
If you need to install the siren further from the Keypad you can purchase a 25′ extension cable.

Step 10 - GSM
We will not be covering GSM for this system. This version of the PG-103 only supports 2G which is no longer supported across Canada and the USA. If you purchase this particular version of the PG-103 then you will be able to monitor your system using the App only.
If you would like to have your system monitored over GSM then you should purchase systems that supports 4G or newer.
Step 11 - Settings
You can access the Settings screen from the menu in the Main screen.
| Exit Delay | When arming the system this is the amount of time in seconds the system will delay arming so you can exit the premise without tripping an alarm. Typical value would be 60 seconds. A count down beep will be heard during the exit period. |
|---|---|
| timer | The timer setting allows you to create timed events. For example, you could have the system Arm everyday at 10pm and/or Disarm everyday at 8am. Timer Events can be created for Disarming, Arming, Arm Home and SOS. |
| Arm Beep | When enabled/On every time you arm the system the siren will chirp to let you know the system armed. |
| Siren | When Enabled/On the siren will sound on any alarm. Disable/Off will turn the siren off. |
| Siren Duration | Setting this value to anything above zero will set the siren duration when activated. A typical setting would be 3 minutes meaning the siren will automatically turn off after 3 minutes of sounding. |
| Arm SMS | Arm SMS (Short Message Service) will have the system send you a text message when arming. Important: You must be using GSM (cellular) for this feature to work. This setting has no effect for this version of the PG-103 which does not support GSM or SMS. |
| Backlight | Turns the Display/Keypad LCD background light ON or OFF when not in use. |
| Alarm message propel | If disabled/Off then Alarm events will not be sent to your phone/device. alarm. When Enabled/On alarm notifications will be pushed to your phone/device. |
| Entry Delay | The amount of time (secs) the system will give you to disarm the system when tripping a Entry zone. |
| Alarm call unit | Allows you to add phone numbers when using GSM |
| Virtual password | Password used when communicating using GSM |
Step 12 - Testing your System
One of the most important steps when installing alarm systems is when you test the system. Even professional alarm technicians some times fail to perform proper and complete checks.
To test your system take your phone and test each sensor in all armed states of the system. This is to ensure that the sensor works and that you have set the Zone Attribute properly. Start with the system disarmed and proceed to the first sensor. Open the door/window or trip the motion detector. The red LED should flash on the sensor. Verify on the keypad that the intended result has occurred. Only 24 hour programmed sensors should cause an alarm at the keypad when disarmed. Next Arm the system and open the door/window or trip the motion. Again, verify the proper operation as intended. If the sensor is an Entry delayed sensor ensure you test the proper duration expires before an alarm occurs.
Repeat the above for each sensor installed while also verifying the proper zone/sensor descriptions are appearing on the keypad.
Next remove the Keypad/Display power adapter from the receptacle and ensure your system remains operational. You should be able to arm and disarm the system as normal. Replace the adapter and verify no change on your Keypad/Display.
You should now have a fully installed and functional system.
IMPORTANT: You must continually check your sensors for proper operation to ensure the batteries still have a enough energy to be able to send a signal to your keypad/display. This system does not have the capability to monitor your sensor batteries and notify you of troubles. This means a sensor could stop working or be removed entirely and you would be unaware. You will need continually test your system to ensure all sensors are functioning.
Step 13 - System Maintenance
The last area to cover is the ongoing maintenance for your system. Since this is a Wireless system you will need to replace the sensor batteries on a regular basis. How long a sensor battery lasts will depend on the activity of the sensor. More activity means shorter battery life. As an example, a motion detector placed in your main hall way where there would be a lot of traffic would most certainly need battery replacement more frequently.
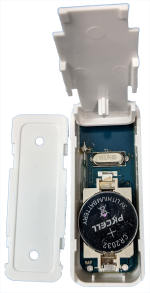
To replace batteries in the Door Sensors just slide off the cover to expose the battery compartment. Replace the battery with a CR2032 Battery.

To replace batteries in the Motion Detectors first remove from its mounting bracket. Use a small standard flat head screw driver to pry open the sensor to expose the batteries. Replace the batteries with two AA Batteries.

The Remote can be opened with a small flat head screwdriver. Insert into the small opening along the side and pry open. Replace with a CR2032 Battery.

The RFID tags do not have batteries

The Display also contains batteries but I don’t believe the manufacture intended the end user to replace them. Opening the display runs the risk of damaging the display. However, if you are willing to take the risk then you can open the case by removing the two rubber plugs that hide the screws keeping the display together. One plug is on the side above the Siren jack and the other is on the back center. Once the screws are removed you can carefully pry open the display to expose two batteries. The 1000ma 3.7 V (in mine part# WZY 523450) rechargeable battery used to provide backup power during power failures and the CR 1220 that I would assume is for the clock and/or memory.
WARNING! Opening the display may result in damage and most certainly would void any warranty you may have. Open only if the display has become a brick.
Products Included in this Article
- Lamicall Adjustable Tablet Stand Holder - Foldable Desktop Stand Charging Dock for Desk Compatible with iPad Air Mini Pro 9.7,12.9, Phone 12 Mini 11 XS Max XR X Plus S10 S9 S8 Smartphones 4-13” - GrayUL Listed Extra Long 6.5 Ft AC Adapter 2.1A Rapid Charger for Fast Charging Hd Hdx 6" 7" 8.9" 9.7" Tablet and Phone Tab Power Supply Cord
Other Products you may be Interested in

Author: Phil Ciraolo
I have been in the security industry for over 44 years. During this time I held many positions including installer, service technician and design engineering. Systems worked with include intrusion systems, video surveillance, card access, intercoms and many others. Installations ranged from small residential to large integrated systems. I have walked across overhead cranes, crawled in under floor dirt crawl spaces, hung from 50 foot bucket truck in -10 degree temperatures all with the sole purpose to install security systems. To help with todays App crazy world I also have formal training in software programming and app development. I hope that with my experience I will be able to help you with anything security and home automation related.
Tags: Learn
You may also like...



Brilliant article, thank you, just what i was looking for regarding this Tuya unit.
Hi, thanks for this interesting article. I’m investigating purchasing a unit like this alarm base unit because just with software alone it doesn’t seem to work (siren + door sensors + tuya app + home assistant incl Alarmo). The siren simply doesn’t publish its capability to be turned on, very frustrating.
That said, i need my door sensors to be part of the broader tuya ecosystem, not only the alarm, as I’m using the same sensors to eg steer the heating when a window is open/closed etc. Is it possible to have sensors enrolled in the tuya app and also use them as an input to the alarm? Or must I enroll the sensors specifically in the alarm to be used only by the alarm? thanks for your time and effort.
I don’t see why you couldn’t enroll in two systems. The door sensors are just sending out a signal blindly. That should mean that any system capable of receiving/understanding the signal should also detect the activation. If you do try this please let us know if it works.
I spent best part of yesterday to try this out: conclusion: it doesn’t work
Approach 1: integrate existing zigbee-based sensors into the alarm. the unit only works with RF-based sensors. TUYA Gateways only do bluetooth, wifi or zigbee (depending on the gateway). So all existing infra cannot work directly with the alarm unit
Approach 2: work with automations to get/put information/status/actions from/to the alarm unit. either I did not find the correct (combination of) parameters or the settings exposed by the alarm unit are in part only a a setting altering the configuration but not permitting to trigger the alarm and/or in part read-only?
I can understand that the vendors of the alarm system prefer to stay away from the cloud-based tuya for their core functioning, but taken the sheer lack of adequate documentation on these chinese components its very frustrating. the alarm unit is capable of being configured and provides info to the tuya ecosystem but cannot be steered/automated from it, which by itself may be just a design choice to prevent illicit access to prevent tampering.
That said I’m disappointed the same sensors cannot be used for security and HVAC controls. every use-case it’s own sensor? ridiculous.
If any one has other, hopefully better experiences, I’m keen to learn. In the meanwhile I’m going to replace/add RF-based sensors to get the alarm unit up and running.
Device bought: vendor: PGST model: PG-105