How to Install Philips Hue Outdoor Motion Detector
In this article we will be covering the installation of the Philips Outdoor Motion detector. To use this sensor, you will need a Philips Hue Bridge (Gen 2) and a Hue lamp. By connecting the sensor to your bridge via the Philips Hue app, you can select which lights go on, even inside your home. You can also choose the scene or light setting that should be activated. The integrated dusk-to-dawn sensor makes sure your lights only switch on when it is actually dark outside helping you to conserve energy.
What you get
You will get everything you need to install this sensor in a multitude of locations. It comes with a very ingenious base/bracket that allows you to mount flat on a wall, in a inside corner or outside corner

Motion detector. High quality construction . Comes with batteries inside

Corner mount. Can be used to mount detector on inside or outside corner.
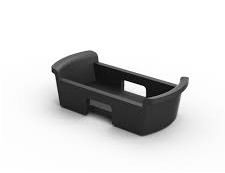
Wall mount. Used to mount on a flat surface or to pipes/down spouts using a cable tie.

Very detailed user’s manual.
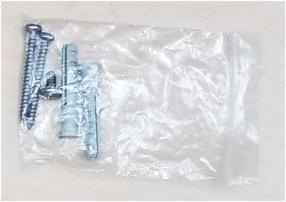
Package of wall anchors and screws for mounting.
Step 1- Add Outdoor Sensor to Philips Hue App
The first thing we need to do is to add your new sensor to the Philips Hue App.
- Open the Philips Hue App. From the Home screen select Settings from the menu at the bottom.
- Select the Accessories option from the Settings menu.
- Select Add accessory button.
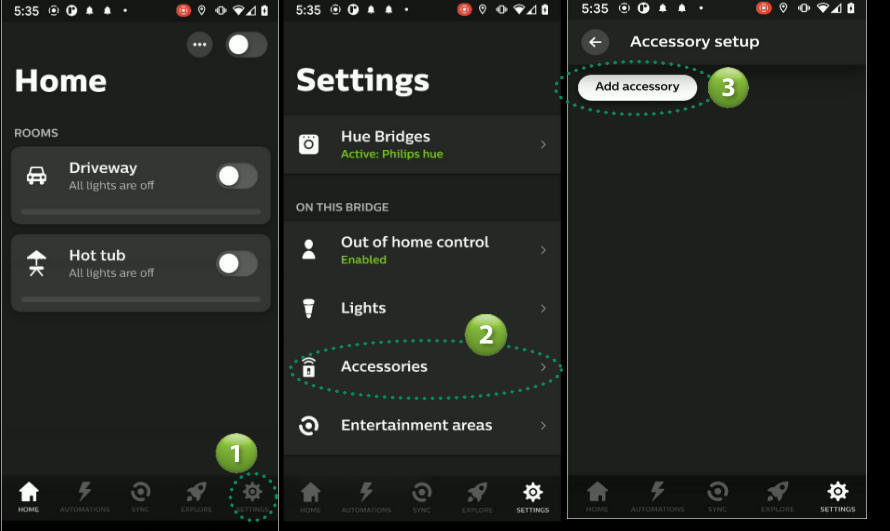
- Select the Hue Outdoor Sensor
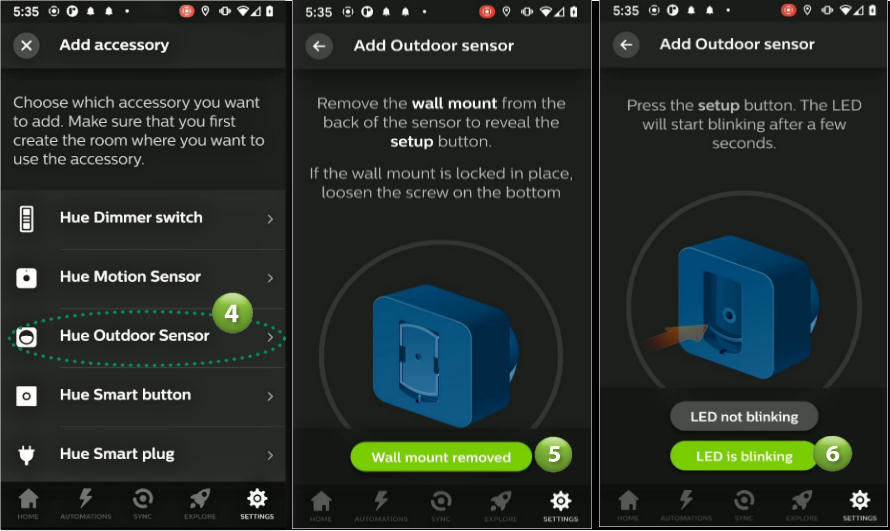
- Remove wall mount from the back of the sensor to reveal the Setup button. Select the Wall mount removed button
- The sensor lens (white portion on front) should now be flashing red to signify it’s ready to be found. Select the LED is blinking button.
- The App will now search for the Outdoor Sensor and will display a Success screen when found. Select the Continue button.
- Select the room you would like this sensor to be added to. In our example we will be adding to our room named Driveway
- At this point your outdoor sensor has been added to the Philips Hue App but has been configured using default settings. If the default setup meets your needs, then select the Done button to complete the setup. If not, then check out the next section for help on configuring the sensor to meet your needs

Step 2 - Configuring the Hue Outdoor Sensor
In this section we will look at the many options you have for configuring your sensor.
- Go to the sensor settings screen by selecting the Change Settings button as shown above. If you are no longer on that screen, then you can select Accessories from Home screen then the name of your sensor.
- The sensor’s settings screen will be displayed. First change the name of your sensor to something that makes sense for you. In our case we will name the sensor “Driveway Motion”.
- Next we need to set the sensor’s behavior during the day. Start by selecting the Between option under the DAY BEHAVIOR section. Here you can specify when the Day period begins by selecting a time (hour and minutes). In our example we will select 8:00am. Select SET when done. Don’t worry about the End time as we will set that from the NIGHT BEHAVIOR section later.

- We now need to tell the sensor what we want it to do during the Day time hours as defined above. From the Settings screen select the Room (in our case we used Driveway, yours may be different).
- Select the scene you want the motion to activate during the Day. In our case we don’t want anything to happen so we will select Do nothing.
- In the After section we can specify what happens after it has tripped during the day. First we need to specify how much time to wait before activating our action. It defaults to 10 minutes but you can change this from 1 to 60 minutes. You can do this by selecting the After option then selecting a time from 1 to 60 minutes. In our example we are not doing anything during the day so we will skip this setting and leave as is. Of course, if you have activated an event/scene above then go ahead and set an After Time.
- While still in the After section, we need to specify what is to happen when a sensor resets and the time expires from step 6 above. Since we have selected to Do nothing during the day we don’t need to worry about doing anything so we will leave this at the default of Do nothing. Again, if you specified some action in step 5 above then you can select what you want to happen After the trip and the After time expires. For example, if you specified that a Bright scene should be activated during the day in step 5 then you could set the After action here to Off or Return to previous state.
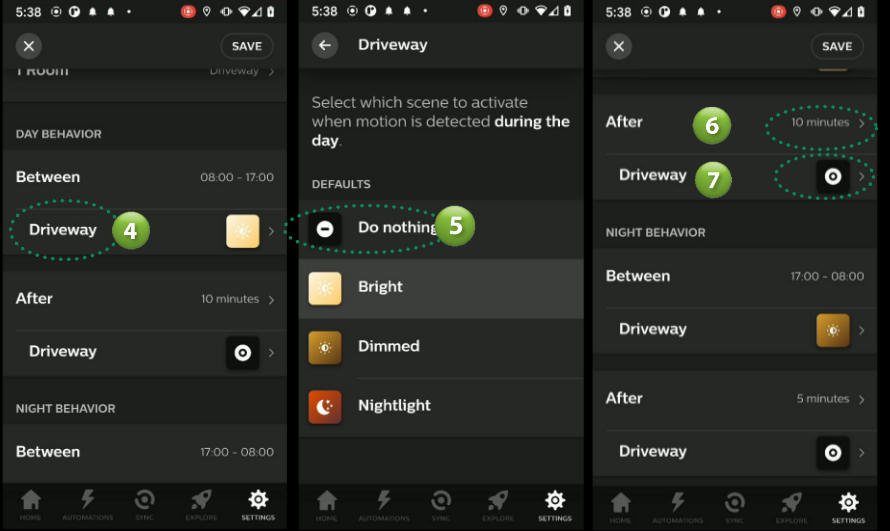
- We now need to setup the NIGHT BEHAVIOR for our sensor. In our example we are installing the outdoor sensor to turn on a front door light and we will want the light to turn on between the hours of 5pm and 8am. We do this by setting the Between time.
- We then select what we want to happen by selecting an action from the Driveway room (this could be a different name in your case). Select the Driveway room
- Select an action that you want to happen when the sensor is tripped. In our case we will activate the Driveway light Bright scene.
- Next we need to set the After action for sensor trips that occur during the night between time. Start with the After time. We have set to 5 minutes. This means that 5 minutes after a sensor is tripped the action you specify in step 12 below will be activated.
- In the Driveway room (your name may differ) select an action that you want to occur once the time expires (step 11). In our case we have selected Return to previous state which will set the light to the state it was prior to the motion being activated.
- Finally select Save to save all your changes.

Step 3 - Hue Outdoor Sensor Advanced Settings
In this section we will take a look at the Advanced Settings Daylight sensitivity and Motion sensitivity.
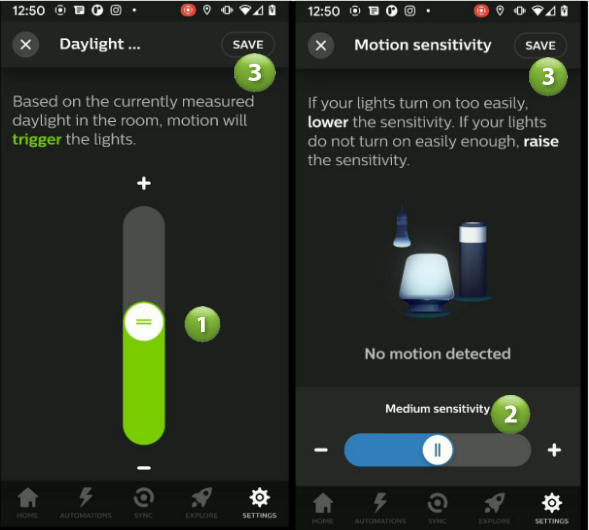
- Select the Daylight sensitivity option under ADVANCED SETTINGS. This is a very important setting and if set incorrectly I believe is the cause of some users thinking that the sensor is defective. Basically what this setting does is determine when the sensor will trigger events based on the current light levels surrounding the sensor. You adjust this by sliding the slider button up and down until you see it turn Green and the text states “trigger”. If the slider turns Orange and the text above states “not trigger” then no matter what happens at the sensor you will not get it to trigger and therefore it may look like the sensor is not working. However, this is not the case and it’s just that at the selected light level it has been told not to activate. Now the other item you need to watch for is when you set this light level. For example, if it is sunny outside and you set this level then the sensor will never trip at night because you told it it needs bright sunshine before activating. Vise versa if you set this level when it’s pitch black outside (around the sensor) then the sensor would be allowed to trip essentially all the time. So to set this level properly we would need to adjust it when the light level outside is at a level that we want our sensor to start tripping. For dusk levels the slider would typically be at approx. 50%.
- To adjust how sensitive the sensor should be select the Motion sensitivity option. If your lights are turning on too easily then lower the sensitivity here. If you lights are not turning on when there is movement in its field of view, then increase the sensitivity here. This screen is also dynamic meaning it shows you when the motion is being tripped in real time.
- Make sure you select Save to save your changes
Step 4 - Installing the Outdoor Sensor
Sensor Placement
To install your sensor we first need to select the best location to provide the coverage you need for your specific application. The sensor should be mounted between 1.5m and 2.5m (59″ and 98″) above the ground. At the 2.5m (98″) height the sensor will detect up to approx. 12m (40′) out from its location. Lowering its height to 1.5 m (59″) will shorten the range to approx. 9m (30′).


This uses PIR (Passive Infrared) technology which has a specific detection pattern as shown below. When planning your location keep in mind that the best detection direction is across the fingers as apposed towards/away motion. Try to place the sensor so that the expected direction of travel would be across the pattern as shown.

Mounting the Sensor
The sensor can be mounted flat on a wall, on an outside corner, inside corner or on items such as down spouts.
On a Flat Surface/Wall

Using the wall mount, fasten it to the surface using the supplied screws and if needed anchors. Place the Sensor over the Wall mount and then tighten the Lock screw. Make sure the sensor is sitting flat on the surface.
On Outside Corner

Fasten the Corner Bracket to the wall using one 3.5cm (1 3/8″) screw. Attach the Wall Bracket using the supplied machine screw. Place sensor over Wall Bracket and tighten the Lock screw. Make sure the sensor is flush to the Corner bracket.
On Inside Corner

Using the wall mount fasten it to the surface using the supplied screws and if needed anchors. Fasten Wall bracket to Corner Bracket using the supplied machine screw. Place the Sensor over the Wall mount and then tighten the Lock screw. Make sure the sensor is sitting flat on the surface.
On Down Spout/Pipe

Using the wall mount, fasten it to the sensor and tighten the Lock screw. Feed a cable tie through the openings on the side of the Wall Bracket and extend around the pipe or down spout. Tighten tie to securely mount the sensor.
Changing Hue Outdoor Sensor Batteries
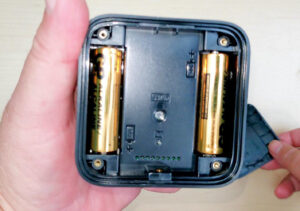
There will come a time when you will need to replace the batteries inside the sensor. This can be done by first removing the sensor from the Wall mount. Next unscrew the 4 Philips screws on the rear of the sensor. Do not remove them entirely. Remove the Lock screw. Pull on the screws to separate the back plate from the sensor. If you can’t remove the plate then unscrew the 4 screws until it releases.
There are two AA batteries inside the sensor. Replace with the new batteries and screw the back plate back on to the sensor. Replace the Lock screw.
Specifications
| Manufacturer | Signify Canada Ltd (Philips) |
|---|---|
| Part Number | 541730 |
| Product Dimensions | 7.59 x 5.59 x 7.59 cm; 145.15 Grams |
| Batteries | 2 x AA Batteries |
| Item model number | 541730 |
| Colour | Black & White |
| Style | Outdoor Motion Sensor |
| Voltage | 3 Volts |
| Item Package Quantity | 1 |
| Batteries Included? | Yes |
| Warranty Description | 2 Year Warranty |
| Item Weight | 145 g |
Products Included in this Article
Other products you may be Interested in
- Philips Hue White LED Smart Button Starter KitPhilips Hue White Ambiance Smart Bulb Starter KitPhilips Hue 552349-2 Smart Plug, 2 Count (Pack of 1), WhiteAMAZON ONELINK IMAGEAMAZON ONELINK TEXT


