Skylink SK-200 Alarm System Installation
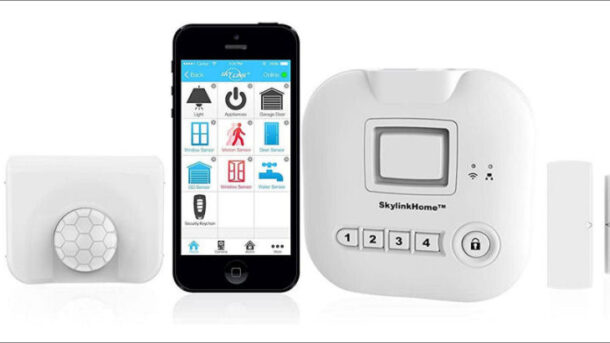
In this article we will be covering the installation of the Skylink SK-200 Alarm Starter Kit. The SK-200 alarm and automation starter kit provides you with the basics needed for a do-it-yourself alarm security. The included Hub connects to your local network and provides easy cloud based remote control and notifications through the Internet. Why is this system perfect for a DIY project? Well there are no set-up or monthly fees. You use the iOS or Android app to monitor and control your system from almost anywhere. Push notifications can be sent to your smartphone whenever an alarm is activated.
What you get
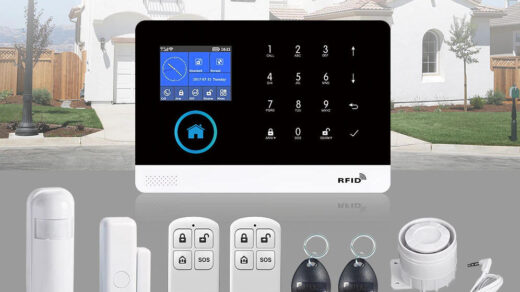
The SK-200 is a starter kit so you only get the devices for a small home or apartment but you can easily add more sensors to expand your system as needed.
Kit includes one (1) Hub. This is basically the brains of the system which communicates with the other devices in your home. It connects to the Internet through your existing Internet router to send notifications to your phone and receives commands (arm/disarm). Requires 4 AAA batteries. (Batteries not included).
Kit includes one (1) Keychain Remote with 4 buttons. Arm Away, Arm Home, Disarm and Panic. You can purchase additional Remotes as needed.
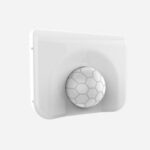
Kit includes one (1) Passive Infrared Receiver (PIR) Motion Detector. This detector can be placed on a table or mounted on a wall and will detect movement within its field of view. Again, you can purchase additional detectors if/when needed. Requires a single AA battery (Batteries not included).
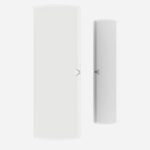
Kit includes two (2) WD-MT Wireless Door/Window sensors. Requires one (1) AAA battery (Batteries not included).
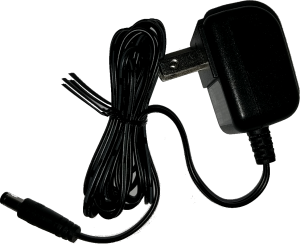
One (1) Power Adapter (6v .5 amp) for the Hub. Comes with 6′ cable

One 6′ Ethernet Network Cable for connecting the Hub to your existing router.
Two (2) Skylink decals.
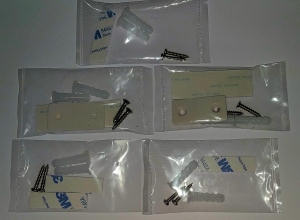
Multiple screws, wall anchors, 3M double sided tape and spacers for the motion detector.
Step 1- Hub Installation & Power Up
The first thing we need to do is setup the Alarm System Hub. The Hub needs to be placed/mounted within 6 feet of your Internet router. This will allow you to connect the Hub using the supplied 6′ Ethernet network cable. If needed, you could order a longer network cable if the Hub needs to be mounted further than 6′. I have included a link to a longer network cable in the Product section at the end of this article.
Connect the Hub to an available network port on your router with the supplied network cable. Then plug in the power adapter to both the Hub and wall outlet. At this point the small network LED should show green. If Red then there is a network connection issue.


Next open the rear compartment on the Hub and insert 4 AAA batteries. These batteries are optional but will keep your Hub operational during a power power outage and is highly recommended.

Step 2 - Download & Install SkylinkNet App
With your Android or Apple smart phone, go to your App store. For Android, this would be the Google Play Store while Apple would be the Apple App Store. These store App’s should already be somewhere on your phone.
1. Once in the store search for the “SkylinkNet” App.
2. Make sure you choose the correct App. The icon has a house with a blue background.
3. Next, select Install.
4. When installed, select the Open button to start the App. Alternatively, you can close the installation screen, find the new icon for the SkylinkNet App and open from there.

Step 3- Create an Account
1. You should now have the Logon screen showing on your phone. If you don’t already have an existing account with Skylink then select the “Create Account” link at the bottom of the screen. Otherwise Login with you existing credentials.
2. Read the Terms & Conditions then select the “I accept” checkbox.
3. Select “Continue”
4. Fill in your Name, Email and Password
5. Select the “Sign Up” link to register

You should now receive an email with a link. Click the link to complete the sign up process and activate your account. Once you click the link you should be brought to a web page confirming you have successfully setup your account.

Step 4- Setup Hub
1. The Getting Started screen should be displayed in the SkylinkNet App. Select the “Setup Hub” link.
2. Select “Initialize a new Hub” button
3. A confirmation screen will be displayed confirming that you have installed the Hub and that it is powered up. This was done in Step 1 above so click the “Continue” link.
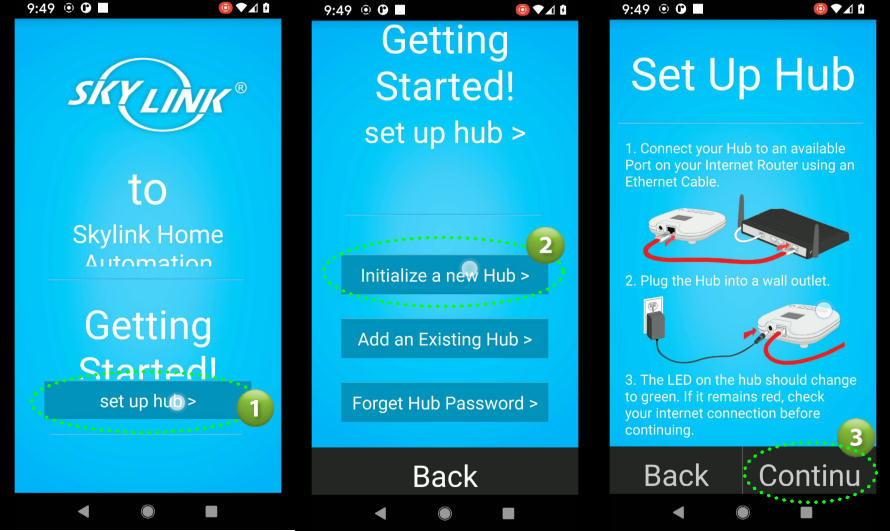
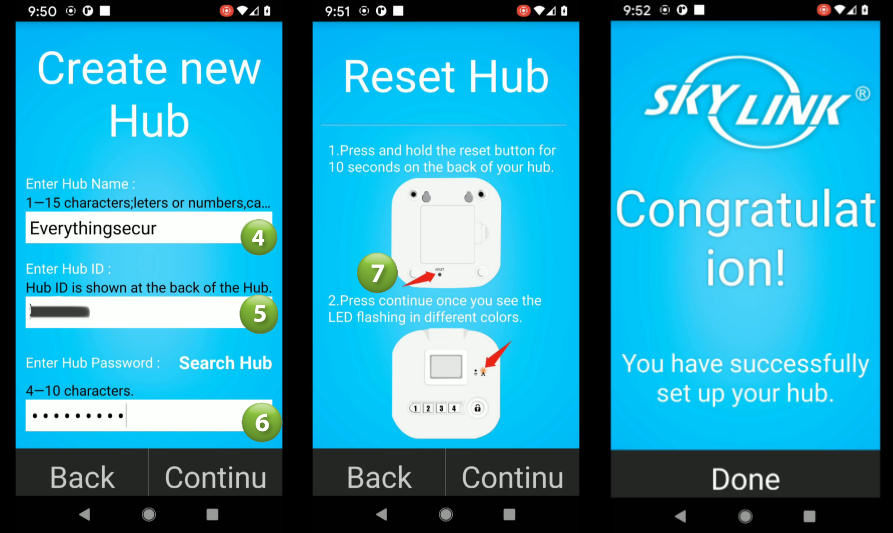
4. The Create new Hub screen will be displayed. Enter a name for your Hub. This name will show throughout the app and describes your Hub. For example, if you only have one hub and it’s in your home then I would recommend “Home” as the name.
5. Look at the bottom of your Hub for its Hub ID number and enter into the Hub ID field.
6. Enter a Password. This is not the code for the alarm. It’s used whenever the App/Server needs to communicate with the Hub.
7. Using a small screw driver or paper clip press and hold the Reset button on the bottom of your Hub. The LED should start flashing in multiple colors. This will initialize communications with your App. The Congratulations screen should now be displayed indicating successful connection to your App. Select “Done” to go to your Home screen.
Step 5 - Power Up Sensors
Before we can learn or enroll our sensors, we will need to first power them up.
For each Door Sensor open the cover by pressing on both sides of the cover (tabs) and pulling. Insert a AAA battery. The red LED should flash when you insert the battery.
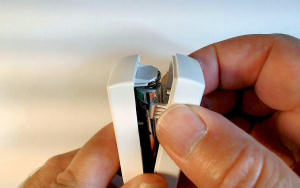
Do the same for the Motion Detector. To open you can use a coin or a flat head screw driver. Again, the LED should flash indicating it is transmitting to the Hub when the battery is inserted. Motion Sensors take a AA battery.

Step 6 - Enroll Door Sensors
We now need to tell the system what Door Sensors you will be installing. The App should be on the Home screen from Step 4 above.
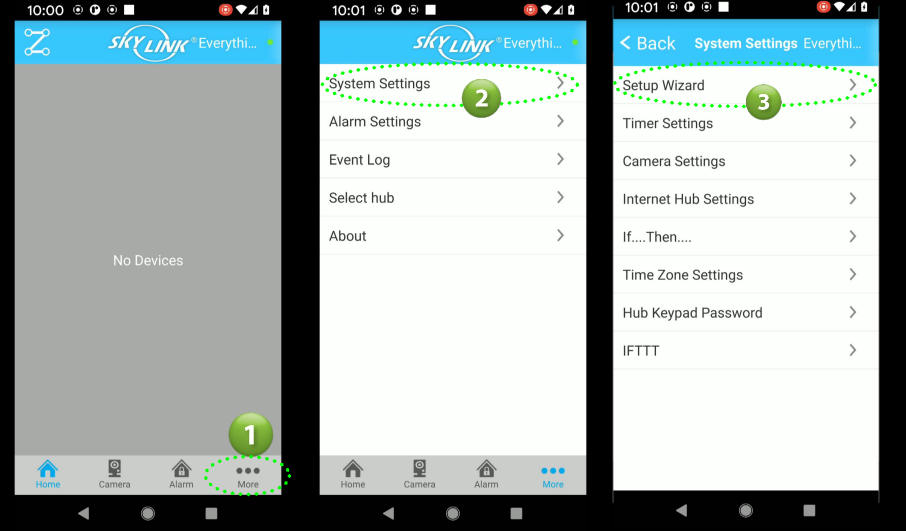
1. From your Home screen select “More” (three dots) to show the Setup Menu.
2. From the menu select “System Settings“
3. Select “Setup Wizard” from the System Settings menu
4. Select “Add Device” from the Setup wizard menu
5. Select “Sensors” from the Add Device menu
6. Select “Door Sensor” from the Select Type menu

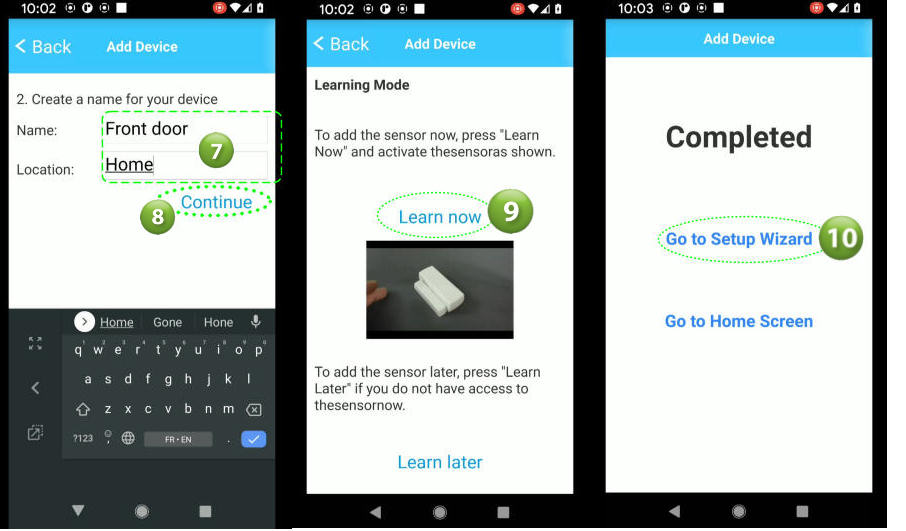
7. Enter a name for this door sensor (i.e. Front door) and a Location (i.e. Home). These two text descriptions will be used to describe the sensor on the App’s Home screen. You can use any combination of text that makes sense for you. So using the text in our example above the sensor icon would look like the icon shown to the right.
8. Select “Continue”
You should now be showing the Learning Mode screen. Before we start the enrolling make sure the sensor you are adding has it’s magnet placed next to the sensor as shown below

9. Select the “Learn now” link. The App will then try to connect to your Hub and learn a sensor. Activate (remove magnet away from sensor) your sensor. The red LED should flash indicating it has transmitted a signal to the Hub. At this time the Completed message should appear confirming that the sensor has been learned.
10. To enroll additional sensors select the “Go to Setup Wizard” link and repeat the above steps. When done with all door sensors select “Go to Home Screen“.
Step 7 - Enroll Motion Sensors
Adding Motion detectors is almost the same process as adding the Door Sensors above. The only difference will be selecting “Motion Sensor” from the Select Type menu.
You should now be at the Setup Wizard screen.
1. Select “Add Device“
2. Select “Sensors” from the Add Device menu
3. Select “Motion Sensor” from the Select Type menu

4. Enter a Name and Location
5. Select “Continue“
The Learning Mode screen will be displayed
6. Select the “Learn now” link to put the system into Learning mode. Push the Learn button located inside the motion detector.
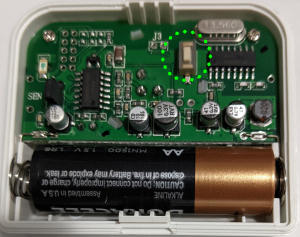
7. The Completed screen will be display to confirm that the motion detector was enrolled or learned. Select Go to Setup Wizard and then repeat the above steps if you have more sensors to enroll.

Step 8 - Enroll Remote Key fob
To enroll or learn a remote key fob follow the same process as adding a Motion Detector but instead you select “Security Remote/Keypad” from the Add Device menu.
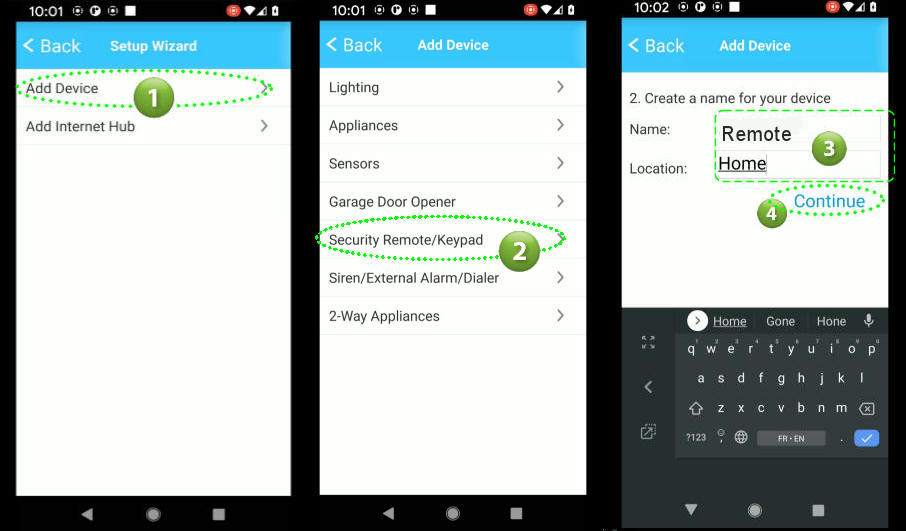

Step 9 - Installing Door Sensors
There are two parts of a WD-MT Wireless Door Sensor. A Magnet (smaller piece) and a Sensor. The Magnet is typically installed on the door or window while the Sensor is installed on the unmoveable frame. However, depending on your particular door/window you can reverse this if needed. Choose the best orientation for your situation while ensuring the gap between the Magnet and the Sensor is no more than 10mm or 1/4″. Important: Make sure the small triangle markings on each piece is lined up and facing each other. To install, use the supplied double sided tape and firmly place each item on the door and frame. When done open the door/window to ensure the two pieces do not touch or rub. The Red LED should flash when you open the door/window. This signifies that a signal has been transmitted. Repeat these steps for all of your door/window sensors.


Step 10- Installing Wireless Motion Detector
Placement of your PS-MT Motion Detectors is important to ensure you get the best possible detection while avoiding false alarms. The following are some do’s and don’ts when mounting your detector.
Don’ts
- Don’t point a detector at a window. Sun light will trip a PIR sensor.
- Don’t install this sensor where pets could enter the field of view (FOV). There are special detectors intended for use with pets.
- Don’t point at a hot air source like vents, heaters, air ducts, refrigerators or stoves
- Don’t mount pointing at ceiling fans or curtains
- Don’t mount detectors in a high humidity area like bathrooms and attics
Do’s
- Do mount between 6-8 feet (182cm-243cm) high from the ground/floor.
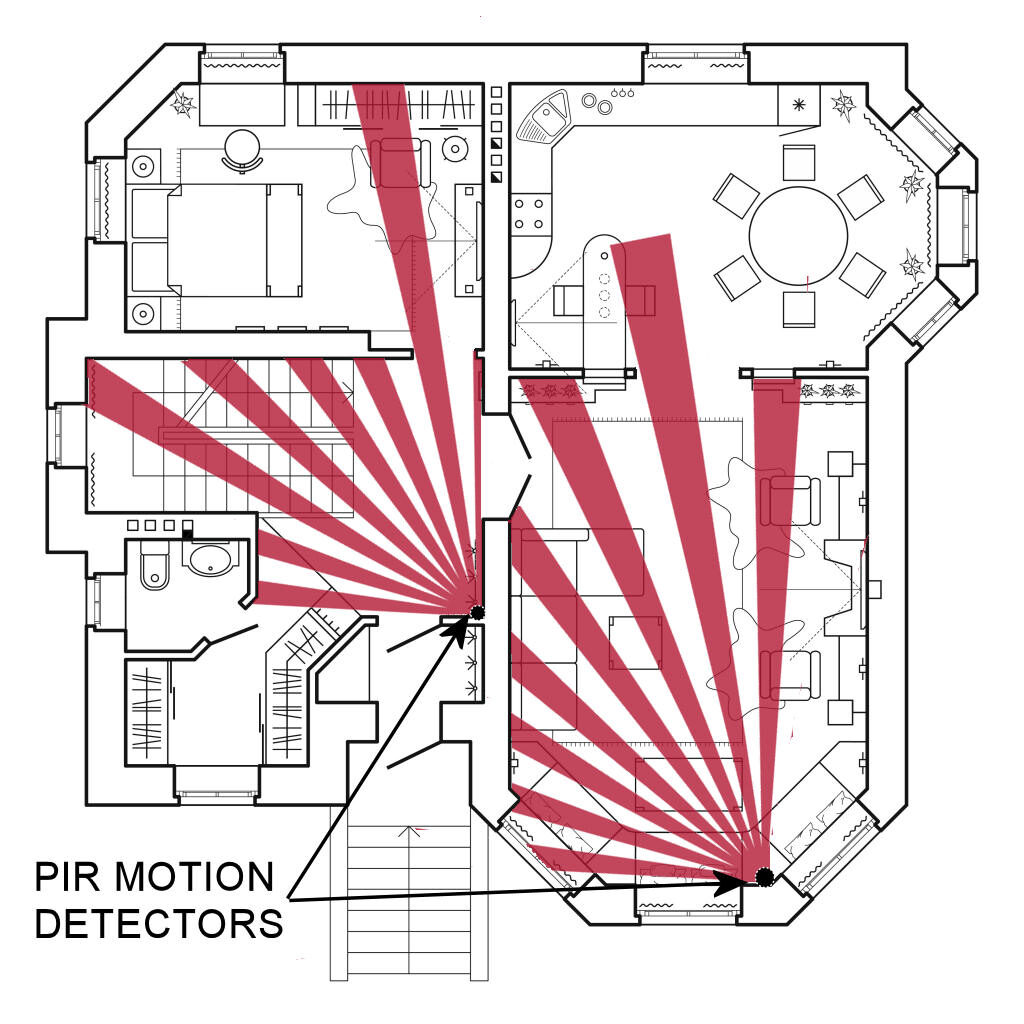
- Do mount sensor in a corner where possible. Corners tend to provide better coverage based on the pattern a detector senses.
- Expected direction of movement should be across the sensor rather than towards/away from sensor if possible. Always try to place sensors where you can take advantage of the cross motion direction.
- Motions placed in central hallways are always a good location as an intruder would typically use the hallway to access different areas.
Direction of Movement

Floor plan with PIR Motions
Mounting the Sensor
To mount a Wireless Motion Detector you can use the supplied double side tape or screws.
To mount on a wall with double sided tape simply apply the tape to the rear sensor and press firmly onto any wall surface.
Note: Removing double sided tape from a wall may damage your surface (remove paint or surface).
If using screws first separate the sensor by removing its back. You will see two indentations for the screws. You will notice that they don’t protrude all the through the sensor. One may be hidden behind a small piece of round foam. Using a Phillips head screwdriver (star) screw the sensor onto the wall through these indentations. You may want to pre-drill to make it easier but with adequate force and a good screwdriver you shouldn’t have any issues.
Corner mounting is a bit more difficult as there are no pre-drill holes or indentations in the sensor. You will need to drill some holes in the angled sides of the sensor back. Then use the screws (and anchors if needed) to mount the back plate of the sensor each wall.
Replace the front of the sensor and you are done.
Step 11 - Configuring the system to meet your needs
In this step we will configure your new system by setting the different options to meet your particular needs.
Setting your System Code (Hub Keypad)
The Hub has four (4) button keypad marked 1-4. These can be used to Arm and Disarm your system by entering an eight (8) digit code.
1. To set a code select the More (3 dots) at the bottom right of your Home screen.
2. Select “System Settings”
3. Select “Hub Keypad Password” from the System Settings menu.

4. In the Password field enter eight digit code. You can only use the digits 1,2,3 and 4. Any combination of those four digits will work.
5. When done select “Save“

To test your new code, enter it into the Hub keypad and press the Lock key. This should arm your system and start a count down timer (beeping). Enter your code again and press the Lock button to Disarm the system
You now have a code to Arm and Disarm your system from the Hub.
Setting your Time Zone
To operate properly the system needs to know which Time Zone you are in. To set your Time Zone:
1. To set the Time Zone select the More (3 dots) at the bottom right of your Home screen.
2. Select “System Settings”
3. Select “Time Zone Settings“

The App will set the Time Zone to what you already have configured in your phone.
4. If the default Time Zone is what you want then just select the Yes link
5. If you would like to choose a different Time Zone then you can do that here. Just select the correct time and the Time Zone will automatically be assigned.
6. Select “Save” to set the Time Zone

Alarm Timing Settings
The Alarm Settings screen allows you to set multiple system timing values.
Siren Duration:
This setting tells the system how long the siren should sound when an alarm is tripped. Select the duration on the right to change the value. Options are 0 (no siren), 1 min, 3 min, 5 min, and 10 min.
Entry delay:
The amount of time the system will delay or wait to activate an alarm when you trip a sensor that has been setup to have a delay. Options are 0 (no delay/instant), 30 sec, 45 sec, 60 sec and 75 sec. Typical setting is 30 secs. A slow pulsing beep will be heard when you trip an Entry sensor and speed up as it gets closer as it counts down to zero seconds. This allows you to enter your premise without tripping the alarm and disarm.
Exit delay:
The amount of time the system will delay arming your system. A slow pulsing beep will be heard during this delay and will speed up as it counts down to zero. This gives you time to exit your premise without tripping any sensors.
Beep Level:
The system will emit beeps to alert you of timer count downs, system armed and system disarmed. This setting allows you to control the volume. Options are Disabled, Normal, Low and high.
Step 12 - Sensor Setup
One of the last things we need to do is to set the Alarm Type for each sensor so that they react to the way you use the system. For example, you may want to have your motion sensors only be armed when you are out of the house (Away Mode). To make this happen you set the sensor Alarm Type to “Arm Away Only” which means this sensor would only be active when you are out of the house (Away). To be armed in the Home mode means that you are still in the house when the system is armed. The following are the different settings available that you can assign to your sensors.
| Alarm Type Setting | Armed Away | Armed Home | Disarmed | Delay on Exit | Delay on Entry |
|---|---|---|---|---|---|
| Arm Away Only | |||||
| Arm Home/Away | |||||
| Instant Alarm | |||||
| Disabled |
Setting your Alarm Type
1. If not already on your Home screen, select the Home Icon at the bottom of your screen. A screen with multiple icons should be displayed that match the number and type of sensors you enrolled in the previous steps.
2. Select the settings icon of the first sensor (in our case it’s the Front door sensor).
3. Select “Alarm Settings” button
4. In our case we will select this sensor’s Alarm Type to “Arm Away Only“. This would mean that this sensor can only trip the alarm if the system is set to the Armed Away mode. Select your Alarm Type by clicking on it in the list. The type will then be set and you will be returned to the Home screen.
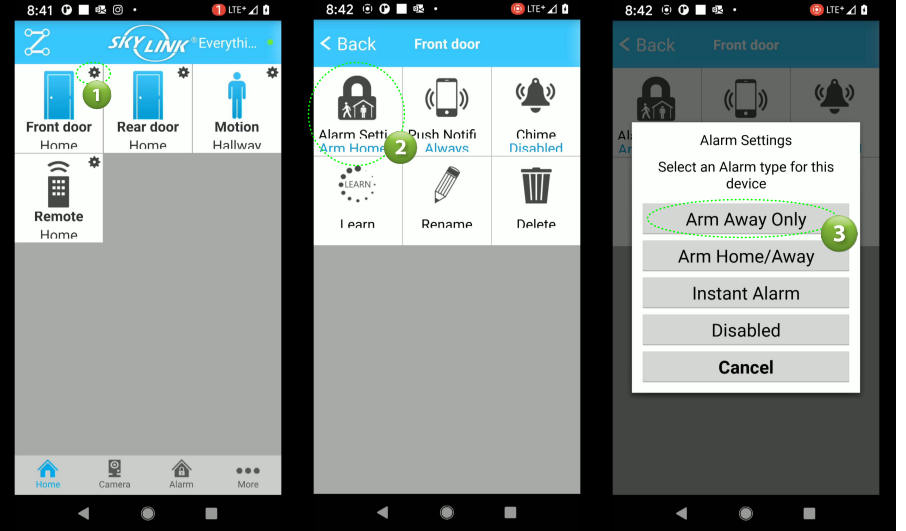
Repeat the steps 1-4 above to set the Alarm Type for each sensor in your system.
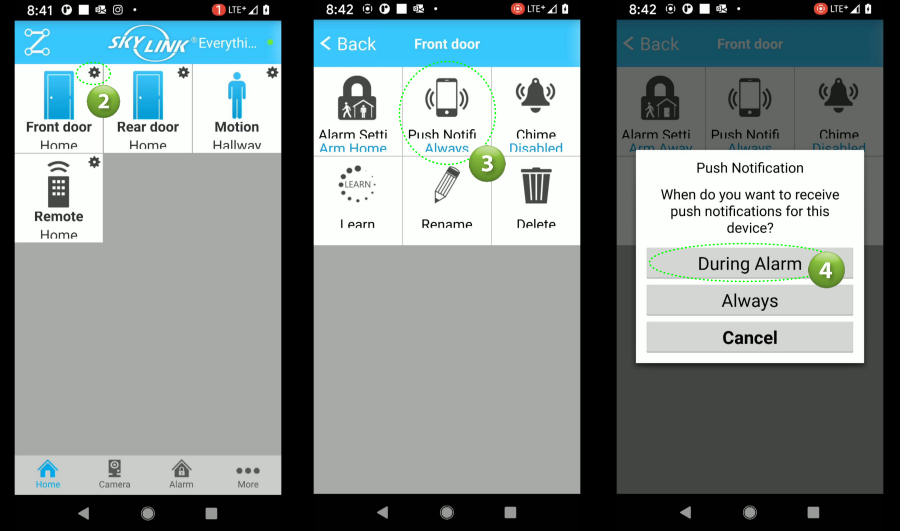
Setting up Push Notifcations
The system has the capability to send notifications to your smart device. This is called Push Notifications. Example of a notification would be an Door Opened message or Alarm tripped message.
You setup Push Notifications for each sensors and Remote in your system.
1. Go to your Home screen.
2. Select the settings icon of the first sensor (in our case its the Front door sensor).
3. Select “Push Notifications” button
4. Select During Alarm Only or Always depending your needs. If Alarm Only is selected then you will receive notifications from the sensor only when the system is armed Away or Away/Home. Typically you would select During Alarm to prevent continuous notifications when the door is opened/closed. Once you select you will be brought back to the Home screen. Repeat the above steps for each sensor and Remotes.
Setting up the Chime Feature
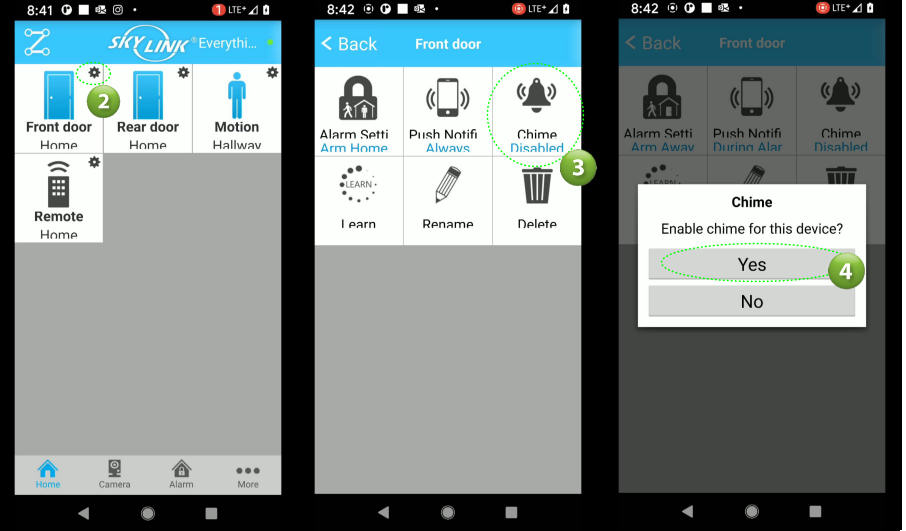
Every sensor can have a Chime assigned to it so that when the door/window is opened or a Motion is tripped you will get a Chime sound from the Hub. This is a fantastic feature and can be useful in many situations.
1. To setup a Chime for any sensor go to your Home screen and select a Sensor button.
2. Select the Chime button from the sensor screen
3. Select Yes to turn on the Chime or No to disable. You will be brought back to your Home screen. Repeat for each sensor you want to Chime.
Step 13 - Testing your System
One of the most important steps when installing alarm systems is testing the system after the install. Even professional alarm technicians some times fail to perform proper and complete checks. It’s important to thoroughly check every device/feature to ensure they work as inspected.
To test your system you can use your phone App and walk the premise while tripping each sensor while putting the system in the different armed state (Disarmed, Armed Away or Armed Away/Home).
1. Start with the system disarmed and proceed to the first sensor.
2. Open the door/window or trip the motion detector. The red LED should flash on the sensor. Verify on the smart App that the intended result has occurred. Depending on the Alarm Type you may or may not receive an alarm trip. Only sensors set as Instant alarm types should cause an an alarm when the system is disarmed.
3. Next Arm the system and verify the Exit count down begins (beeping).
4. Open the door/window or trip the motion while in the exit count down. You should not receive an alarm.
5. After the count down as expired, open the door/window and the entry beeping should start. Once the entry delay expires you should receive an alarm. Verify the proper icon displays the alarm. Also, make sure the duration of the entry delay is adequate to allow you time to disarm the system (if using the Hub keypad).
Repeat the above 5 steps for each sensor installed while also verifying the proper zone/sensor icons are appearing on the App.
Next remove the Hub power adapter from the receptacle and ensure your system remains operational. You should be able to arm and disarm the system as normal. Replace the adapter and verify no change on your smart App.
You should now have a fully installed and tested system.
Step 14 - Using your New Wireless Alarm System
In this section we will cover the day to day use of your new alarm system. The different screens below can be opened by selecting the appropriate icon on the bottom of your screen.
Home Screen
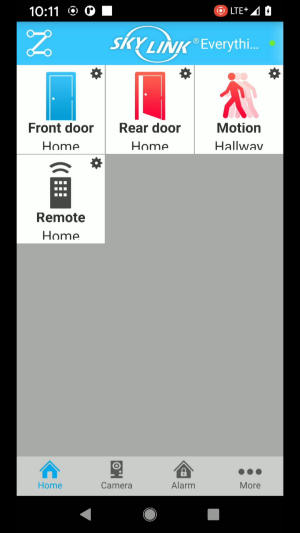
The Home screen is where you can quickly see the status of every sensor in your system. Each sensor will show a button with a icon depicting the type of sensor (Door, Motion, Remote etc.). These are real time status icons so they change as the sensor status changes. When a sensor is tripped or open it will show a red icon and a blue icon when its in normal state (closed/no motion detected).
Alarm Screen
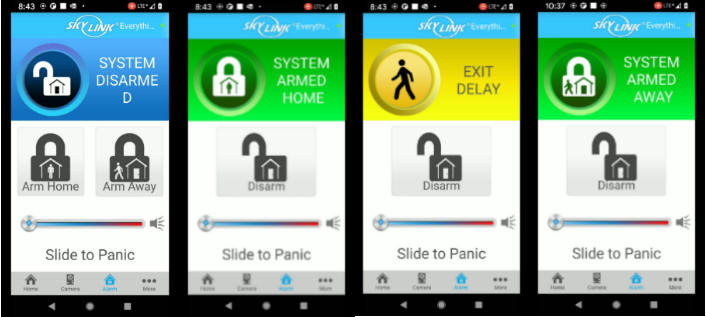
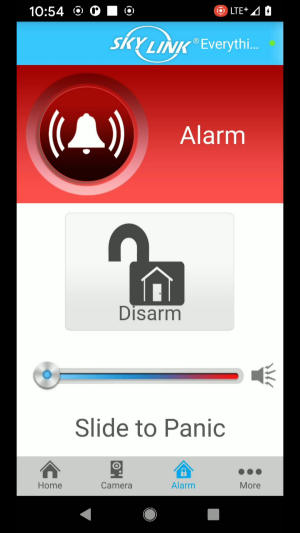
The Alarm screen displays the current armed status of your system (Disarmed, Arm Home or Arm Away). You can also arm your system into any mode from this screen.
Panic
The Alarm screen displays also provides a Panic feature were you can activate the Panic feature of the system by using the slider and swiping to the right. This will activate the siren in the Hub (if not disabled in the Alarm Timing Settings in Step 9 above). It can be used if at any time you feel threatened. Once activated you can turn it off by by the App, Remote or keypad on Hub.

Remote Key Fob
The MK-MT Remote key fob is probably going to be the most used method to arm/disarm you system as it is so convenient. It has four buttons on it that allow you to arm/disarm and initiate a Panic alarm.

Hub Keypad
The Hub includes a 4 digit keypad (1-4) which allows to you to Arm and Disarm your system. You setup a 8 digit code in Step 11 above. To Arm your system simply input the 8 digit code then press the Lock button. The system will bein its exiting sequence count down. To Disarm just enter your code and press the Lock button.
There are two LED’s on the Hub which indicate the following:
| LED | Green | Red | Flashing Red Slowly | Flashing Red Rapidly | Orange |
|---|---|---|---|---|---|
| NA | System Armed | Alarm Activated Memory | Sending/Receiving Data | NA | |
| Network Connected | No Network Connection | Connecting | NA | Connecting to Network |
Event Log
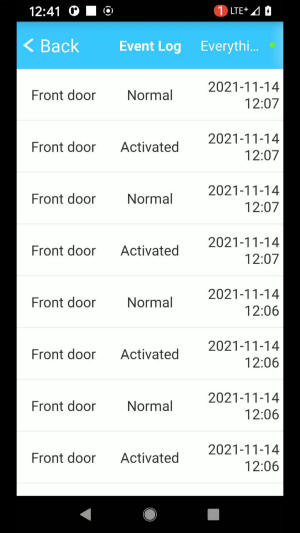
The Event log can be found by going to your Home screen, selecting the More (…) link then selecting “Event Log“. Here, you can see everything that has happened on your system with the date and time it occurred.
Step 15 - System Maintenance
The last area to cover is the ongoing maintenance for your system. Since this is a Wireless system you will need to replace the sensor batteries on a regular basis. How long a sensor battery lasts will depend on the activity of the sensor. More activity means shorter battery life. As an example, a motion detector placed in your main hall way where there would be a lot of traffic would most certainly need battery replacement more frequently. The sensors in this system are equipped with a Low Battery feature which will alert you when a battery is low and needs replacement.

To replace batteries in the Door/Window sensor open the sensor by pressing on the tabs on the side and pulling open. Replace with a AA battery.

To replace batteries in the Motion Detectors use a small standard flat head screw driver or coin to pry open the sensor to expose the batteries. Replace with a AA Battery.

To replace the Hub batteries open the cover on the rear and replace with 4 AAA batteries
Specifications
| Manufacturer | Skylink |
|---|---|
| Product Dimensions | 38.74 x 10.16 x 12.7 cm; 589.67 Grams |
| Batteries | AA and AAA (not included) |
| Item model number | SK-200 |
| Colour | White |
| Power Source | 120VAC Adapter - 6VDC Output |
| Mounting Type | Surface Mount |
| Usage | Indoor use only |
| Included Components | Internet Hub HU-100 X 1, Door/Window Sensor WD-MT X 2, Motion sensor PS-MT X 1, Keychain Remote MK-MT X 1, Power Adapter X 1, Ethernet Cable X 1, Mounting Accessories |
| Warranty Description | 1 Year |
| Item Weight | 590 g |
Products Included in this Article
Author: Phil Ciraolo
I have been in the security industry for over 44 years. During this time I held many positions including installer, service technician and design engineering. Systems worked with include intrusion systems, video surveillance, card access, intercoms and many others. Installations ranged from small residential to large integrated systems. I have walked across overhead cranes, crawled in under floor dirt crawl spaces, hung from 50 foot bucket truck in -10 degree temperatures all with the sole purpose to install security systems. To help with todays App crazy world I also have formal training in software programming and app development. I hope that with my experience I will be able to help you with anything security and home automation related.
Tags: Learnsecurity systemsk-200skylinknetwi-fi alarmwireless alarm





I have replaced the battery of my door sensor with brand new battery but keep getting the low battery alert.
Does this require some type of reset?
Hi Igor, It should reset on its own. If not you can try below:
1. Completely reset alarm (power down and backup)
2. Check/replace batteries in all sensors not just the one you believe has the issue. Possible multiple sensors on same zone?
3. Ensure the sensor is within range of the hub. Temporally move closer to test
4. Re-add the sensor to the SkylinkNet App by going to “Setup Wizard” > “Add Device” and following the on-screen instructions.
If none of these work I would suggest contacting their support. They are good at responding and could likely resolve the issue.